Thursday, April 29, 2010

Maiden Flight

After many frustrating nights of tuning our PID and a total of about 1.5 months of hard work, we decided to try our quadrotor.


We weren't completely happy with our PID terms, but we knew that we would only really be able to see how our unit responded while flying in air. We found a nice open area in the engineering building and set up camp. Our very first flight was a little rough but very promising! We could see that one derivative term was a little high on the pitch side, so we tuned that down a little and we could fly! We still have a huge amount of PID tuning to do, but this becomes worlds easier now that we can see our quadrotor actually flying. We broke some rotors on some rough landings, but nothing too serious. New landing gear helped us avoid too much damage.


This was a fantastic night. We took several videos of more than a minute of flight, and even then we only stopped flying because somebody had opened a door and a draft was flowing through the room that our sloppy PID couldn't handle well enough.

Finally, a good flight!

Casualties

Casualties of the Wyvern Quadrotor Project:
  • 1 Brushless Motor: We aren't actually quite sure what happened to this motor. After one of our test launches to see if the quadrotor could get off the ground successfully, we were delighted to see it rise up and clear the box take-off pad. However, we were then horrified to watch it plummet with great velocity into a lab bench. This also bent up our aluminum frame in a way that it may never forget.
  • 1 tri-blade prop and 3 (so far) dual-blade props: The tri-blade prop was lost at the same time as the brushless motor above. The dual-blade props were all due to our first day of flights with the landing resulting in the quadrotor flipping over. While flipping, the props (much stiffer than the three blade props) scraped against the hard floor and chipped.
  • First attempt at landing gear. This consisted of 4 standoffs screwed in perpendicular to the ground. This didn't last long with Paul behind the controls.
  • "Nubbins": These are the small ABS plastic pieces that are glued into the motor supports so that screws can be used to hold the motor tightly to the aluminum support rods. These things fly everywhere!
Here are a few of the crashes we suffered:

Tuesday, April 27, 2010

IMU Errors

After almost two weeks of attempting to tune our PID controls, we found an odd occurrence. While at low RPMs, the IMU would output correct data for both Euler angles as well as rotational velocities. However, when we increased the speed of the motors to see how the PID controls reacted with higher RPMs, the IMU began to think that it was a consistent 3 degrees from horizontal while it was actually held flat. In addition to this offset, the data for the Euler angles (Pitch and Roll) as well as their respective angular velocities would vary greatly (about +/- 20 degrees for Euler angles and about +/- 200 degrees/sec for the angular velocities).

This was far from usable. These results would cause the quadrotor to move quickly in one direction without correction while also becoming wildly unstable. Hoping that it was a purely mechanical problem since the code on the IMU (Open-Source Razor AHRS code) uses high-level Direction Cosine Matrix (DCM) and normalization algorithms that are already tuned to the IMU characteristics, we started with two possible culprits: vibrations and electro-magnetic interference (EMI).

Our first idea was to try reducing the vibrations that the IMU experienced while the motors were running. The screws that were holding the IMU in place on top of nylon spacers were removed and small pieces of foam tape were placed in-between to act as dampening washers. These did not help, as the noise was still present in the output to the MaEvArM.

Our next idea was to replace the screws holding the IMU onto the nylon spacers with rubber bands placed in an "X" with the foam tape pieces in between. This actually helped at slightly reducing the errors we were seeing in the angular velocity as well as decrease the magnitude of the noise in the Euler angles. However, we were still seeing the 3 degree offset at higher RPMs.

After trying a couple vibration-reduction methods with small improvements in the IMU output, the possibility of EMI was addressed. Since the IMU was being placed close to the outputs of the ESCs (which had cables that changed direction quickly and carried high currents), it was thought that this could be causing some error in the IMU when the motors were run at higher currents/speeds. (Although moving a magnet near the IMU did not seem to have any effect, we tried this solution anyway). Using conductive tape, each of the wire groups output from the ESCs were covered and then grounded. This produced no visible effects in our tests. Noise and offset were still present.

Next, the idea that the rotors were causing too much vibration was addressed. When we visited the GRASP laboratory, we were able to inspect their quadrotors (which they purchased) and see them in action. One noticeable difference we saw was that the motors on the GRASP lab quadrotors cause little to almost no vibration. With this in mind we attempted to remount our rotors to try and balance them. This was not very effective with the tri-blade rotors for some reason (possibly since they are of lesser quality). When we switched to the dual-blade rotors, we saw a significant improvement in the amount of vibration. In addition, the noise produced by the rotors greatly decreased. We were surprised at this, since when we did our research we read that the tri-blade props were supposed to be quieter and produce less vibrations. Although this change did result in less noise, the errors in the data output from the IMU were still enough to prevent our controls from working effectively at speeds high enough to fly.

Our last idea before we attempted a software correction for this data error was to move the IMU to a new position and use a better dampening material. The IMU was swapped with the MaEvArM, which placed it directly onto the frame instead of on nylon spacers. To absorb vibrations, a square of open-cell foam was placed in between the frame and the IMU. The MaEvArM was then mounted on top of the nylon spacers (this actually helped a lot since the Load/Run swich and reset button on the MaEvArM were difficult to reach before). When the motors were spun up to speed, the IMU output was almost perfect (although there were small errors, these were less than a degree and would not prevent us from flying). The nylon spacers were believed to be amplifying the vibrations since they were not completely rigid (they were able to flex).


In the end, we determined that the vibrations caused from the motors spinning at high speeds induced large errors in the IMU readings. By moving the IMU to a location directly on the frame, using a better insulating material, and switching to the dual-blade props we were able to solve the errors and allow for further flight operations.

Monday, April 26, 2010

The Controller

Until this point we controlled our quadrotor with keyboard input from a computer transmitted with our RF board from SparkFun. It was somewhat naive of us to try to even fly without controls for yaw, pitch, roll, and thrust. Finally we incorporated 2 joysticks from SparkFun on our wireless transmitter to allow us to control Thrust/Yaw with the left stick and Pitch/Roll with the right stick. We also added 4 LEDs (red, green, yellow, and blue) to our controller to indicate different statuses.

The inputs from the controller ranged from 0 to 5V and therefore from 0 to 1023 when using our 10 bit ADC on the ATMega32u4. This corresponded to +/- 512 resolution for yaw, pitch, and roll, and +512 resolution for thrust (ignoring negative thrust inputs). This was scaled appropriately to give smoother PWM responses. The idle thrust was also increased from, on a scale from 1000 to 2000, 1106 (our very lowest idle PWM) to 1200 in order to give us more resolution in controlling the thrust. Note that hovering is around 1300.

In the future we will add buttons to the controller for start and emergency stop. As of now we still have to press 's' on the PC connected to the controller and SPACEBAR for emergency stop.

Update:
We have now added battery voltage ADC to the wyvern code. The battery voltage is sent back in Volts*10 every 6 seconds to the controller. If the voltage is below 10V, all LEDs on the controller will toggle on and off to warn the user of a low battery.

Thursday, April 22, 2010

Increasing Code Efficiency

After we completed our first full version of code we spent several days in the lab trying to fine tune our PID terms. After a lot of frustration, we decided to take a look at the quadrotors in Penn's GRASP lab as a comparison. After feeling their PID response, it was painfully obvious that our response time was not nearly as fast as we thought it was. The GRASP lab units run their full PID loop at 1000 Hz. We thought that we were running our PID loop somewhere around 40 Hz, and, being a little naive, we thought this would be adequate. After all, we can't see that fast!

In order to increase our code efficiency we did several things. First, we increased the UART baud rate from the IMU to the MaEvArM from 38,400 to 250,000. This allowed us to read in angle and gyro values faster so the PID functions didn't hang up waiting for information. Second, we changed some while loop codes in the UART receiving functions to brute force assignments. This had an amazing effect, changing our 40 Hz response to 120 Hz! Of course, this was not nearly as fast as the response in the GRASP lab, but, having read reports of successful PID loops as low as 70 Hz, we thought we'd give the new code a try.

The difference was incredibly clear; the derivative terms were much more responsive, and our morale was much improved after fruitlessly toying at PID gains for so many days.

After this, we constantly checked the frequency of our PID loop after adding any new considerable block of code. Also, the bottleneck for increasing our code speed was determined to be the output of the IMU. Running the DCM and correction algorithms produced a max speed of 120 Hz. One possible method to increase this (without changes in code) would be to replace the 8 MHz oscillator on the Razor IMU with a 16 MHz or even a 20 MHz oscillator. The Atmega328p is able to handle these clock speeds, and increasing to them would result in large improvements in the data output speed.

Saturday, April 17, 2010

IMU Data Transfer Corruptions

While receiving data from the IMU over the serial connection, a strange event was happening. Every once in a while (approximately every 20 data transmissions when we printed the data over serial to the computer) a large jump in the data would occur. These "hiccups" produced VERY bad responses. While attempting to work with our PID controls, the quadrotor would be smooth and then violently respond to the data (for instance, the pitch would read 0 and then jump to -1400).

After disabling subsections of our code one-by-one, the culprit was found. It was determined that the wireless transmission from the controller was causing our data from the IMU to be sporadically corrupted. These errors in the data were large enough to throw our quadrotor into an unstable state. Our solution to this problem was to disable the wireless receive interrupt (the pin-change interrupt that indicates there is data to be read) while reading the IMU data over serial. This allowed the data to be loaded in its entirety before the wireless was read, thus preventing corruption in our IMU data.

Thursday, April 15, 2010

Wireless, PID Controls, new Props, and First Motor Spin-up

We have completed and started several things since the last post. First of all, we have fairly robust RF communication between two MaEvArMs. This allows us to send motor commands to a Wyvern unit and to receive telemetry data back from the unit. As we continue to tweak our PID controls, this will also allow us to change our gains without reprogramming the unit. We have finished writing the majority of the PID control code, but the road to a stable, hovering quadrotor will undoubtedly present us with more challenges than we foresee.

After all of our soldering and wiring we re-massed our unit at about 695 grams. After landing gear we expect to be just slightly above this. This would give a new flight time of about 12.5 minutes with the tri-blade props that were tested in previous posts. However, since then we have ordered new tri-blade 8x4 props that have characteristics similar to the two-blade props tested earlier. In fact, they seem to match the two-blade props at lower RPMs and even outperform them at higher RPMs.

The first motor spin-up was very successful. We were able to achieve a thrust that we determined to be adequate for hovering (determined by holding the body lightly and seeing if it would lift). Knowing that all of our mechanical parts were in order, we were able to turn our full attention to developing the rest of the code.

Below are some videos of test flights before our PID code was optimized.

Wednesday, April 14, 2010

Battery and Charger

So our batteries are in ready to be charged. After some research to determine which characteristics (weight, Amp-hours, output current) would affect us the most, we decided to go with 3-cell (11.1V) Lithium Polymer (LiPo) batteries rated for 2200 mAh and 25C. This means that the battery can provide 50 Amps of continuous current (as well as hit peaks of up to 100 Amps!!!).

Blue LiPo 3-Cell 2200mAh 3S1P 11.1V 25C Battery

To charge the batteries, we chose a high-end LiPo battery charger with on-board balancer. Balancing the LiPo cells equalizes the voltage and results in both longer run-time as well as battery life. The Thunder AC6 battery charger is able to handle several types of batteries (LiPo, LiIon, LiFe, NiCd, and NiMH) as well as 1 to 6 cells. The charger can charge from 0.1 to 5 Amps and discharge (to give a fresh charge to a battery) from 0.1 to 1 Amp.

Thunder AC6 Battery Charger


Tuesday, April 13, 2010

Mechanical Design

Design Considerations:

We went into the design process with the goal of creating a simplistic, low-cost, robust, and manufacturable quadrotor platform. The general design consists of three major components, the motor nodes, the support rods, and the central node. It was essential that the design be reconfigurable, thus a multiple node schematic was followed which allowed for an extent of modularity that enables us to potentially adapt the quadrotor to multiple roles. With this in mind, no part of the quadrotor is glued together (.....yet, as we have not found any significant structural issues, though it is possible that the high frequency vibrations induced by the motor/rotor might reveal a need for gluing). Additionally, we have attempted to utilize electrical connectors over soldering, at a slight weight cost.

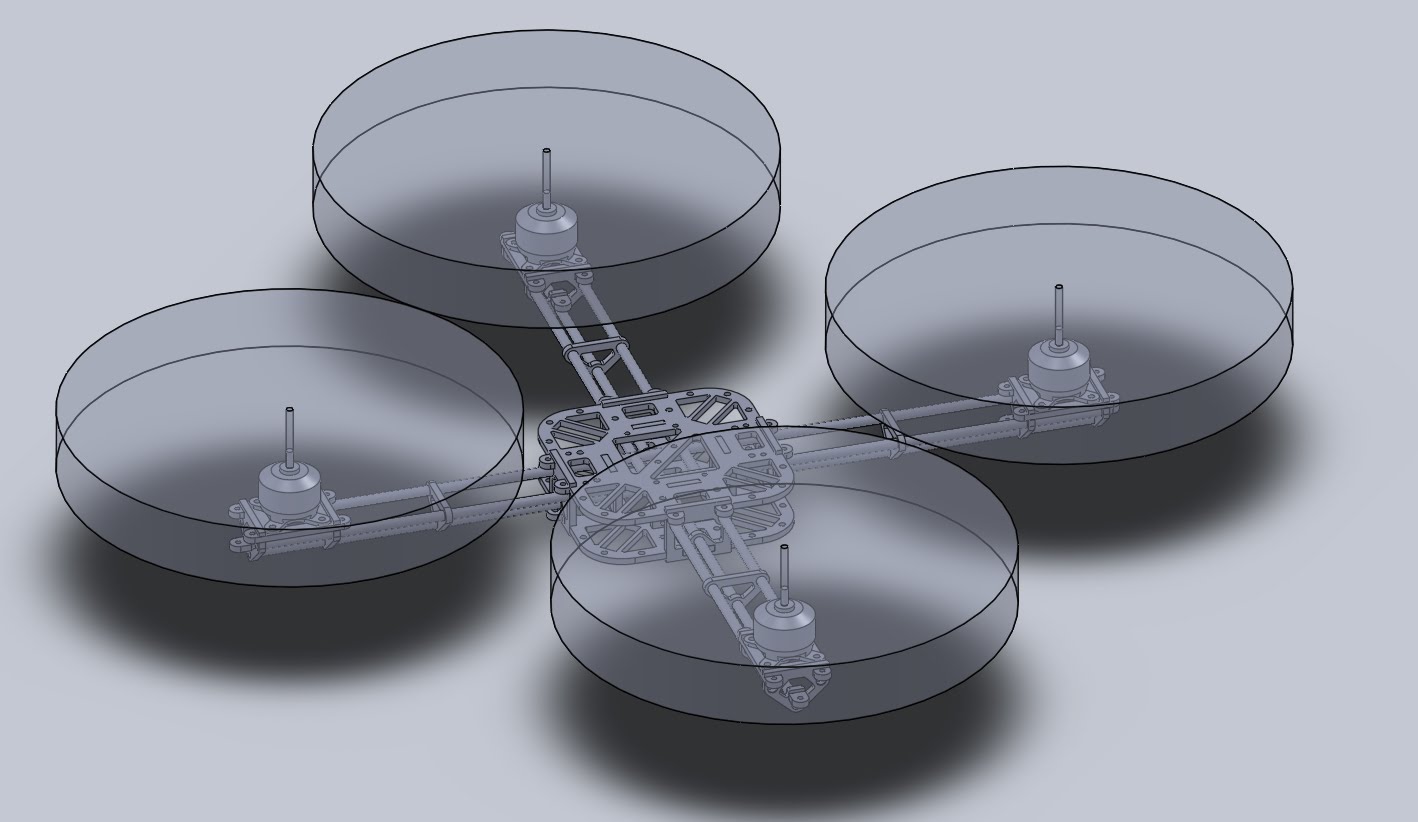
Below are photos of our SolidWorks model and of the design process. In the SolidWorks model the rotors are represented as clear cylinders.

SolidWorks-Looking down and Iso views:


As referenced above; A, B and C represent a motor node, the support rods, and the central node respectively. One might note that the central node consists of two layers; this facilitates component placement. Following images will show the configuration of components.


Materials:

With regards to materials, the motor nodes and central node are cut out of 1/8 [in] Acrylonitrile Butadiene Styrene (ABS), while the support rods are 3/8 [in] hollow aluminium. Additionally, a number of 3[mm] steel screws are used for fixing the motor nodes and central nodes to the rods, and for fixing the motors and boards to the nodes. We felt that the aforementioned materials allowed for rapid assembly while maintaining a reasonable overall weight. This was confirmed by our overall frame mass which was about 130 grams. Improvements in the use of materials will be noted in the 'comments' section.

Assembly:

Assembly proved quite rapid and easy. A few iterations for finding the optimal hole sizing for the node->rod interface were necessary, but meticulous modeling ensured that the majority of our parts fit well. It was apparent that the rods would have to overlap in some way, which we solved by crimping the rods at intersection points. Holding the nodes in place was accomplished through the use of screws that pressed down on the rods, providing a surprisingly robust fix. If one watches carefully during the thrust testing video they will see a nut fall off of a screw, while this was not an issue during the test since each screw had an additional redundant nut, we decided to eliminate such uncertainty in our quadrotor by tapping the ABS. The ABS to screw friction combined with the dampening that the ABS provides should keep the screws from rotating during operation.

A motor attached to a motor node:


Close up of the Center Node:


Central Node Configuration:


The slots in the central node house the ESCs for our brushless motors (A2208-14). Wires from the ESCs are routed through the openings at the top of the node through those between the rods out to the motors. The battery is placed on the bottom of the central node, and the 'ping' sensor (our current altimeter, at least until we get our barometer output working properly) will be placed under the node as well. Our Control, IMU, and wireless boards are configured to be placed between the ESCs on the top of the central node.

The Frame with ESCs, Battery, and Motors incorporated:


Central Node with ESCs, Battery, Control Board:


Comments:

We believe that the current frame will prove sufficient for our purposes. It is light, sturdy, easy to construct, and capable of housing the components we require, yet we feel that when we have more time improvements are possible. Wiring up the quadrotor has made us realize that more consideration of wire routing might prove beneficial during the modeling process. Moreover, our nodes seem more robust than necessary and we could probably stay within our design goal of robustness while reducing mass of material used. In the future, use of carbon fiber tubing and sheets, and perhaps even thermoplastics might allow for an equally functional structure that is lighter and more aesthetically pleasing.

Overall though, considering that we designed and assembled the quadrotor over a weekend and accomplished the majority of the wiring in a day (some wiring was on hold while we waited for the appropriate connectors), we are quite happy with our results. And we must admit, this is one cool looking quadrotor.


Monday, April 5, 2010

Initial Thrust Testing

This past weekend we built a test platform in order to do some basic thrust tests with our motors and the two different props we have. This gave us a general understanding of how much current we need per motor in order to keep our aircraft hovering. We were able to more accurately determine this because we have our first body finished! There will be more on the body in following posts. The thrust test platform consisted of a lever made from ABS and a metric scale, so that prop thrust generated a proportional weight on the scale. By scaling this thrust by the ratio of the lever lengths we were able to get an approximate measurement of lift (in grams) versus current for our two props.

Thrust test bed:


Video of tri-blade ramping from idle to 8 Amps (12000 RPM):


Our findings indicate that the two prop configurations are similar, but at lower currents (as in hovering) the 2-blade prop is more efficient than the tri-blade, and at higher currents (above 5 amps) the opposite is true.

Thrust vs. Current plot:


The difference in efficiency at high and low current output is particularly evident when plotting RPM versus current as in the figure below. Note that at higher currents the dual-blade prop has a lower RPM gain per Amp than the tri-blade, and the tri-blade has a higher RPM gain per Amp than the dual-blade at lower amps. The general difference in RPM between the tri-blade and dual-blade is due mostly to the diameter of the props.

RPM vs. Current


To determine the efficiency of our system, we measure the entire weight of our body (adding on some weight to for wires to be conservative) with a particular battery, and determine the hover time based on battery capacity and the current required to hover.

For example, using Blue Lipo lithium polymer batteries with 2200 mAh (at about 185g) we have a total body weight of 615g. In order to hover we need each motor to generate 615/4 or about 154g of "thrust". With the tri-blade this corresponds to about 2.2 Amps per motor (8.8 Amps total). With the dual-blade this corresponds to about 1.8 Amps per motor (7.2 Amps total). With our 2200 mAh battery, this gives a flight time of:

Tri-blade -- 2.2 Amps*Hour * (60 min / Hour) * (1 / 8.8 Amps) = 15 minutes
Dual-blade -- 2.2 Amps*Hour * (60 min / Hour) * (1 / 7.2 Amps) = 18.3 minutes

This indicates that at hovering, the dual blades are (18.3-15) / 15 * 100% = 22% increase with respect to the tri-blade efficiency. This, however, was not enough to convince us to use the two blade props over the three blade props...the tri-blades are much quieter and, let's face it, look way too badass.

With a 1500 mAh Mystery Lipo we found the following flight times using the same metric:

Tri-blade = 12.5 minutes
Dual-blade = 15 minutes

Here's the mess we made in the undergraduate electrical engineering lab: