Showing posts with label Sensors. Show all posts

Saturday, March 27, 2010

Razor IMU Bootloader Issues

After connecting the Razor 9DOF IMU to the Arduino IDE and attempting the upload the code to the board, the following errors were displayed:

avrdude: stk500_getsync(): not in sync: resp=0x72
avrdude: stk500_disable(): protocol error, expect=0x14, resp=0x72

The board was connected correctly to the computer (since we were reading values output from the sample code pre-loaded onto the chip) and the IDE settings were correct. The correct COM port as well as the correct board (Arduino Pro or Pro Mini (3.3V, 8Mhz) w/Atmega328) were selected.

So after several hours of searching online and looking at other posts/replies regarding this type of issue (such as resetting the board, updating the FTDI drivers, etc), it was mentioned that it may be possible that either the Arduino Bootloader was the wrong version (since SparkFun just changed these boards from the Atmega168 to the Atmega328) or even the Bootloader was corrupted. With these in mind, we tracked down a programmer to try re-burning the Bootloader to the chip.


We weren't able to find an ISP programmer (any from the list in the Arduino IDE, such as the AVRISP or AVR ISP mkII), however we were able to find a AVR JTAGICE mkII programmer. This programmer is able to program through either the JTAG or ISP pins, which is great since the only connections available on the board are Serial and ISP/SPI. Since this programmer is incompatible with the Arduino IDE, we had to use AVRStudio4. Here are the steps we took to re-burning the Arduino Bootloader and getting the Arduino IDE to communicate with the chip:
  1. Connected the programmer to the computer with the USB cable (and made sure that the computer had the correct drivers for it).
  2. Connected the programmer to the board. After soldering pin headers to the 6-pin ISP/SPI connection, the squid breakout cable (which allows for each of the 10 JTAG cables to be connected individually) was connected using the following websites: JTAGICE mkII (for the programmer connections) and Razor 9DOF IMU Schematic (for the Razor ISP/SPI connections).
  3. In AVRstudio, click "Tools" and then "Program AVR".
  4. In the "Main" tab, change the device to "Atmega328p" and the programming mode to "ISP".
  5. In ISP settings, we used 500kHz since the board has a 8MHz clock (ISP requires something under 1/4 the system clock for any board running below 12 MHz. 8/4 -> anything under 2MHz). We chose this just to stay on the safe side.
  6. Click "Read Signature". We got a long hex string back (in the box under device name). This is a very good sign, since it means that we are getting data back from the board.
  7. In the "Program" tab under "Flash", find the bootloader (this hex file is located in the Arduino folder so for us it was under arduino-0018\hardware\arduino\bootloaders\atmega). We used the ATmegaBOOT_168_atmega328_pro_8MHz.hex (several posts we found indicated that this was what should be used on this board).
  8. Click "Program". The Razor board as well as the Tx and Rx pins on our FTDI board lit up as the data was sent and the new Bootloader was burning onto the chip. We didn't see any errors listed at the bottom of the screen, but we clicked "Verify" to make sure.
After we went through these steps, we were able to upload the AHRS code on the board using the Arduino IDE without any problems.

Thursday, March 25, 2010

9DOF Board Has Arrived!

Alright, so a few updates since the last post:

The 9DOF IMU (Inertial Measurement Unit) has arrived today from SparkFun. At 1.95" x 1.10", the board is only slightly larger than the MaEvArM. Currently, the connections are set so that the board outputs all of the sensor data over the serial output (Tx and Rx pins), however we'll be looking into the other possible connectors on the board (look like SPI). If they are, we may be able to use the board to grab data from our barometric pressure unit, which also arrived today. This keeps the sensor data separated from our main processor (the Atmega32U4 on the MaEvArM) which will be doing the PID and motor control. More on this board will be posted soon.


9DOF Razor from Spark Fun


FTDI USB to Serial adapter from Spark Fun:


Barometer IC from Spark Fun:


MaEvArM Microcontroller with ATMega32u4:


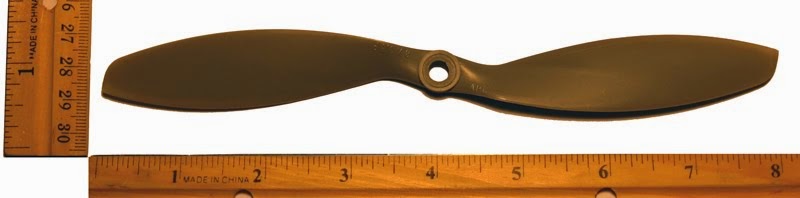
The props have arrived. We've decided to get a couple variations to test which works best. (All our sets consist of two normal and two counter-rotating blades. This prevents us from having to tilt the motors in order to counteract the rotational inertia).
  • The first set are two-blade, 8x3.8 props. (8" diameter, 3.8 blade pitch). These are fairly large rotors and have decent specs when run on our motors (will post more detailed results later).


  • The second set are tri-blade, 7x3.5 props (7" diameter, 3.5 blade pitch). After some research, it was found that tri-blade props can be quieter than dual-blade when run at the same speed. We'll also post tests with these props once the motors come in (still on their way from Singapore!).


Lastly, we've been starting to program the MaEvArM's basic tasks to ensure that our specifications will be made. So far, two main tasks have been tested and working properly:
  • Four 16-bit PWM channels (0-65536 resolution) have been tested to control the four motor controller (Brushless ESCs). With the System Clock set to 8MHz, a 150Hz output signal was able to be generated with a resolution of 0-53333 (this will have to be tested with the ESCs since they normally take 50Hz Remote Control Standard servo controls).
  • Buffered Interrupt-controlled serial communication was successfully accomplished by modifying the AVR306 (Atmega UART) code to work with the Atmega32U4 registers. This will allow us to read the output from the 9DOF board without wasting CPU usage (allowing for our PID calculations, PWM Control, and Wireless Receive to run continuously). This code uses a Circular Buffer technique to get store data when the CPU is in use and read it when it has time to.

That's it for now, but we'll keep you updated with our progress!